Protocols - SOPs
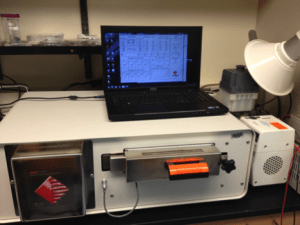
Atomic-Layer Deposition (ALD, Arradiance Gemstar)
STANDARD OPERATING PROCEDURE – ATOMIC LAYER DEPOSITION (ALD)
AUTHORED BY: ANDREY IVANKIN, 2012
DATE OF REVISION: 8-15-2016, Hannah Bialic
Step 0: Ensure your samples are clean and dry either through solvent cleaning, or by plasma oxygen using the RIE.
Step 1: Open GemStar ALD Software on the laptop. You should see the following window on the screen (see photo below in Step 2)
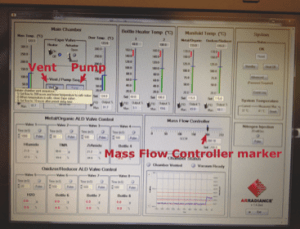
Step 2: Press the “Vent” button (see the photo below) Important: Make sure that the Mass Flow Controller marker (blue) moves from 0 to the set value of 200 (black tick) (see the photo below). If this is the case, proceed to the Step 4. If the marker does not move to the set value of 200, go to the Step 3.
Step 3: Make sure that the nitrogen tank is open (when you walk into the room, the tank will be on the left side. See the image below). If the tank is closed (0 on the gauge), open and try to vent the system again, as described in Step 2. If it solved the problem, proceed to the Step 4. If the tank is empty, replace the tank. If the tank is not empty and was opened or after opening the tank the Mass Flow Controller marker does not move to the set value, stop the experiment and contact Andrey (see contacts below).
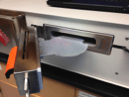
Step 4: Loosen the black knob and open the door. Put your sample in the center (see photos below). Close the sample door, tighten the black knob and press the �Pump� button next to the �Vent� button (see photo for the Step 2). Important: The door and the sample plate can be hot!
Step 5: Choose the procedure to run in the Recipe Sequence window (see photo below), which should also open when you opened the GemStar ALD window. In the Recipe Control section (see the photo below) press �Load� button and go to: c:\Users\GEMSTAR\GemStarData\ RecipeFiles Choose the desired recipe. Important: Make sure that the right precursor is chosen. String 16, column Device: ALD 1 Actuator for HfO2 ALD 2 Actuator for ZrO2 ALD 4 Actuator for Al2O3 If there is a mismatch, try to choose a different recipe file.

Step 6: String 30 (Loop n Times) in the Recipe Sequence window set the value to the number of cycles you want to run the deposition.
Step 7: In the File Logging section in the Recipe Sequence window press the �Event Log� button to create a log file (see photo for the Step 5).
Step 8: In the Run Control section in the Recipe Sequence window press the �Run Cycles� button (see photo for the Step 5) to start the deposition. And wait till the Estimated Remaining Time in the Recipe Time section (see photo for the Step 5) will go to 0.
Step 9: Loosen the black knob, open the door and take out the sample. Important: Be careful, the door and the sample plate are hot.
Step 10: Close the door and press the �Pump� button in the main GemStar ALD window. Important: Do not close the laptop lid, do not restart the computer, and do not close the GemStar ALD program. Emergency contact: Meni Wanunu 617-460-0638 (cell)